¶ 1. Introduction
Open vSwitch (OVS) is an open-source, multilayer virtual switch designed to enable advanced network automation while supporting standard management interfaces and protocols. It is primarily used in virtualized environments to facilitate communication between virtual machines (VMs), as well as between VMs and the physical network.
¶ 2. Installation
- OVS can be installed by running this command:
sudo pacman -S openvswitch
- After successful installation, we need to enable and start the OVS service:
sudo systemctl enable --now ovs-vswitchd
¶ 3. Create a vSwitch
OVS and its switch(es) can be managed with the tool ovs-vsctl.
- To create a new switch run:
sudo ovs-vsctl add-br <your switch name here>
Please replace <your switch name here> with a name of your choice.
¶ 4. Connect virtual Network devices
¶ 4.1 Manually
Virtual network devices can be created manually, through your hypervisor, or via a container. They will appear and function like physical network devices.
- To list all network devices run:
ip a
- With the example output down below we can see three devices:
1: lo: <LOOPBACK,UP,LOWER_UP> mtu 65536 qdisc noqueue state UNKNOWN group default qlen 1000
    link/loopback 00:00:00:00:00:00 brd 00:00:00:00:00:00
    inet 127.0.0.1/8 scope host lo
       valid_lft forever preferred_lft forever
    inet6 ::1/128 scope host noprefixroute
       valid_lft forever preferred_lft forever
2: enp49s0: <BROADCAST,MULTICAST,UP,LOWER_UP> mtu 1500 qdisc fq_codel master ovs-system state UP group default qlen 1000
    link/ether 00:48:54:20:41:e0 brd ff:ff:ff:ff:ff:ff
    altname enx0048542041e0
    inet6 fe80::248:54ff:fe20:41e0/64 scope link proto kernel_ll
       valid_lft forever preferred_lft forever
3: ve-databaselCjq@if2: <BROADCAST,MULTICAST,UP,LOWER_UP> mtu 1500 qdisc noqueue master ovs-system state UP group default qlen 1000
    link/ether 82:22:48:3a:2b:1a brd ff:ff:ff:ff:ff:ff link-netnsid 4
    altname ve-databaseserver.dmz
    inet 169.254.19.70/16 metric 2048 brd 169.254.255.255 scope link ve-databaselCjq
       valid_lft forever preferred_lft forever
    inet 192.168.244.177/28 brd 192.168.244.191 scope global ve-databaselCjq
       valid_lft forever preferred_lft forever
In this example, we use ve-databaselCjq, which is a virtual network device that was spawned from a systemd-nspawn container.
- To connect it to our vswitch, run:
sudo ovs-vsctl add-port <your switch name here> ve-databaselCjq
- If you want to tag the packets of that adapter to a specific vlan, use the
tagparameter:
sudo ovs-vsctl add-port <your switch name here> ve-databaselCjq tag=<your vlan id tag here>
¶ 4.1 Automatically through libvirt
If you followed this guide to create the hypervisor stack with qemu/libvirt, you can add your newly created switch to the networks known by libvirt. This allows you to select your vSwitch in the GUI, and your VM’s virtual network device will be automatically added to that vSwitch on boot.
- Start
virt-managerand right-click onQEMU/KVM, which is marked blue on the screenshot below. Then click onDetails.

In the new window, switch to the Tab Virtual Network, and then click on the + sign in the left buttom corner.
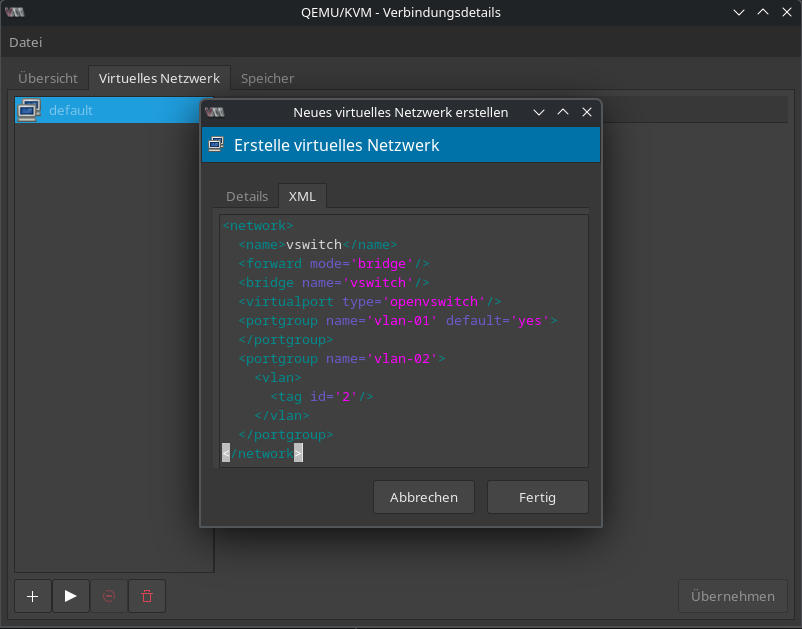
- Then switch to the
XMLtab and replace the content with the following:
<network>
  <name><your switch name here></name>
  <forward mode='bridge'/>
  <bridge name='<your switch name here>'/>
  <virtualport type='openvswitch'/>
  <portgroup name='vlan-01' default='yes'>
  </portgroup>
  <portgroup name='vlan-02'>
    <vlan>
      <tag id='2'/>
    </vlan>
  </portgroup>
</network>
- Replace
<your switch name here>twice in the given config. With theportgroup-tag you can define the vlan's you want to use on that switch.
¶ 5. Connect vSwitch to a physical network
If you want to connect your vSwitch to a physical network, you must use a physical network device.
Please note that the used network device must not have a IP address assigned!
- To add
enp49s0from the example output above, run:
sudo ovs-vsctl add-port <your switch name here> enp49s0
If you have only one physical network device and/or want to use it for the networking of your host device, you must assign an IP address to the vSwitch instead of the physical network device. This can be done using any tool; for example, with Network Manager's GUI or through systemd.
¶ 6. Connect two vSwitches over the Internet
If you have two devices connected via VPN over the Internet, it is possible to connect their vSwitches. This allows devices on these vSwitches to communicate with each other without further configuration. If your vSwitch is connected to a physical switch, it is even possible to connect physical devices through that tunnel over the Internet. This can be useful for many purposes.
- Run the following on both hosts:
sudo ovs-vsctl add-port <your switch name here> vxlan0 -- set interface vxlan0 type=vxlan options:remote_ip=<IP address of other host>
As always, replace <your switch name here> with the name of your switch, and <IP address of other host> with the IP address of the host with the other vSwitch. Thats it; your connected devices can now communicate safely over the Internet.
If your clients can ping each other, but further communication does not work, it's probably an MTU issue.
¶ 6.1 Fix MTU issue
The MTU defines the maximum size of each packet transferred. While ping packets typically do not fill up to this maximum, "real" communication does. The default MTU is 1500 bytes; if you send a packet of that size through a tunnel, the tunnel itself needs to add information like source and destination addresses. This can exceed the MTU, causing the packet to be split, which may lead to problems for your client's communications. To fix this, simply lower the MTU for your clients to, for example, 1200 bytes. This adjustment can be made through your DHCP server or manually.
¶ 7. Additional commands
- To list all connected devices of your vSwitch, run:
sudo ovs-vsctl list-ports <your switch name here>
- To disconnect a network device, run:
sudo ovs-vsctl del-port <your switch name here> <your adapters name here>